Blacklist
Manually block specific IP addresses, IP ranges, and placements. Permanent, user-controlled, separate from automatic exclusions.
The Blacklist is your manual block list — entries you add by hand and that stay until you remove them. It's separate from Exclusions, which is the automatic list ClickFortify manages from detection results.
Open the page
In the sidebar, click Blacklist.
What you can blacklist
| Type | Example |
|---|---|
| IP Address | 203.0.113.7 |
| IP Range (CIDR) | 203.0.113.0/24 |
| Domain | malicious-site.com |
| Placement | com.spam.app (mobile app placement ID) |
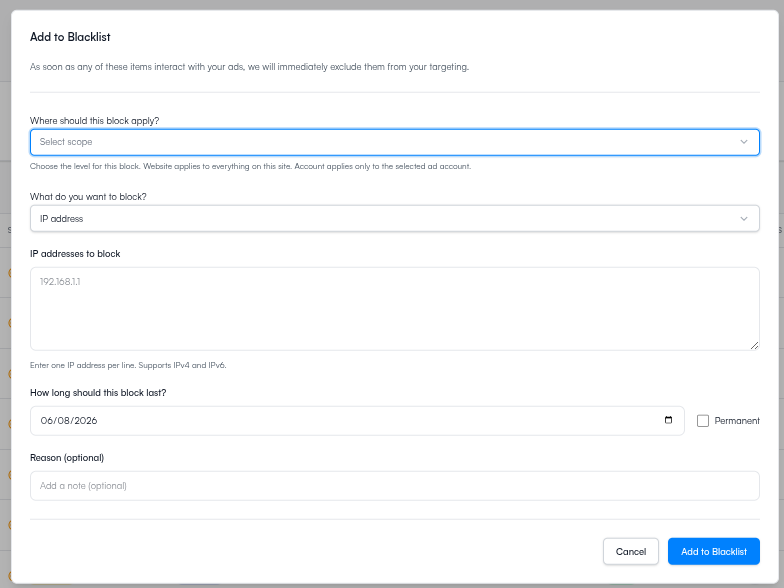
Add a blacklist entry
Worked examples
Block your office IP so internal page-checks don't waste budget
| Field | Value |
|---|---|
| Type | IP Address |
| Entity | 203.0.113.42 (your office's public IP) |
| Scope | Domain (so every site in this space is covered) |
| Note | Office IP - HQ Seattle. Marketing team tests ads from here. |
| Expiration | (none — permanent) |
Why: Your team clicks your own ads during testing. Without this, every internal click costs you money.
How to find your office IP: open https://www.whatismyip.com from the office network.
Block a competitor's known office IP range
| Field | Value |
|---|---|
| Type | IP Range |
| Entity | 198.51.100.0/24 |
| Scope | Domain |
| Note | Competitor Acme Corp office network — clicks logged on 2026-04-12 and 2026-04-15. |
| Expiration | (none — permanent) |
Why: A /24 covers 256 IPs — useful when a competitor uses a small office range. Use cautiously: /24 ranges can also catch legitimate visitors who happen to share the same range (e.g. co-working spaces).
Block a known fraud source from a Display campaign
| Field | Value |
|---|---|
| Type | Placement |
| Entity | com.spam.app (or low-quality-site.com) |
| Scope | Campaign (just the Display campaign) |
| Note | Spammy mobile app sending 0% conversion traffic. |
| Expiration | 90 days (revisit) |
Why: Display Network placements are where fraud concentrates. Blocking at the Campaign scope leaves other campaigns unaffected if it turns out to be a false positive.
Temporary block during an active attack
| Field | Value |
|---|---|
| Type | IP Address |
| Entity | 192.0.2.99 |
| Scope | Website |
| Note | Active attack 2026-05-20 — 50+ clicks in 1 hour. Auto-expire after 30 days. |
| Expiration | 30 days |
Why: Sometimes you just need a quick block. Setting a 30-day expiration means the entry cleans itself up so the list doesn't grow forever.
The table
Each row shows when the entry was created, its scope (Domain / Website / Campaign), type, the entity itself, status (Active / Pending / Expired), how many ad impressions it has blocked, your note, and the expiration.
Use the date-range picker at the top right to filter by when entries were added.
Blacklist vs. Exclusions
These two lists look similar but behave differently. Pick the right one for the situation:
| Blacklist | Exclusions | |
|---|---|---|
| Source | Manual — you add it | Automatic — detection or automations |
| Control | You manage it | ClickFortify manages it |
| Persistence | Permanent (until you remove) | May expire or rotate |
| Visibility | Shows your note | Shows the detection reason |
Use the Blacklist for entities you already know are bad — competitor IPs, your own office IP, known fraud sources. Let ClickFortify discover the rest through Exclusions.
When to use the Blacklist
- Competitor IPs. If you know a competitor's office IP, add it. Stops them clicking your ads.
- Internal traffic. Block your own company IPs so you don't waste budget on internal page checks.
- Known fraud sources. If your analytics or reports surface a clear bad actor, add it to the Blacklist with a note.
- Bad Display placements. A site or app that consistently sends low-quality traffic.
Remove an entry
Removing a Blacklist entry means the entity can see and click your ads again. Make sure that's what you want.
Best practices
- Always add a note. "Why did I block this?" is the question Future You will ask in three months.
- Review every 90 days. Permanent entries pile up. Some are still useful; some aren't.
- Use ranges carefully. A
/24is 256 IPs; a/16is 65,536. Blocking large ranges can block real users. - Check Exclusions first. ClickFortify may have already caught what you're about to block.
- Coordinate with the team. A teammate adding a competitor IP without telling you can look like a bug from the outside.
What happens next
- Exclusions — the automatic side of blocking
- Team — make sure the right people can manage this list