
Tracking script
The post-onboarding Protection Script page — check tracking status, reinstall, switch install method, manage your GTM tag, and find your site's `<head>` section.
The Tracking page in the sidebar is where you manage your tracking install after onboarding. Use it to check whether the snippet is still firing, reinstall if it broke, switch between manual and GTM install, or remove the GTM tag.
For the first-time install during onboarding, see Install tracking instead — the wizard version walks through the same install but is structured as part of the 5-step setup flow.
Open the page
In the sidebar, click Tracking. The page is titled Protection Script.
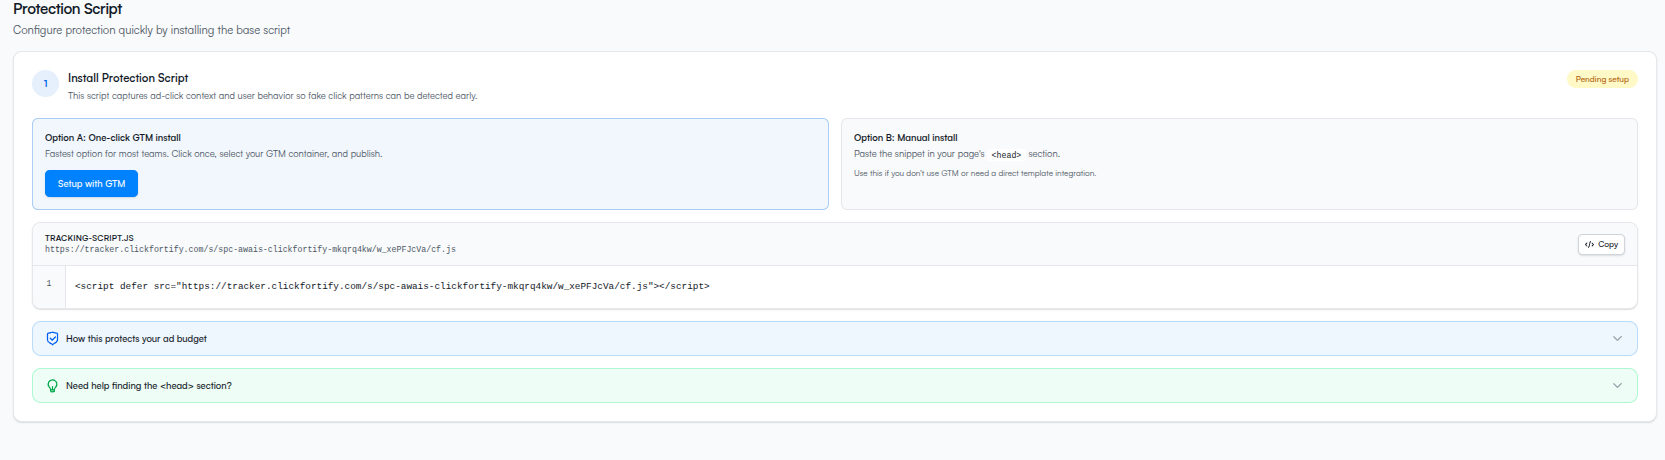
The status badge
At the top, a colored badge tells you the current state of tracking on the active website:
| Badge | Color | What it means |
|---|---|---|
| Active via GTM | Green | ClickFortify's tracking tag is published in your GTM container and firing. |
| Tracking detected | Green | The manual snippet is installed on your site and firing. |
| Pending setup | Yellow | No tracking detected yet — install (or reinstall) to fix. |
If the badge says Pending setup but you installed tracking earlier, see Auto-detection and troubleshooting.
Install Protection Script
Two side-by-side options.
Option A — One-click GTM install
The fastest path if your site uses Google Tag Manager.
This is the same flow as the wizard's GTM option — see Install via Google Tag Manager for the full walkthrough with screenshots.
Option B — Manual install
Use this if you don't use GTM or need a direct template integration.
</head> tag on every page of your site.Full walkthrough with screenshots: Install via manual snippet.
"How this protects your ad budget"
An info card on the page explains what the snippet does, in plain terms:
- Captures key click identifiers (like Google click IDs /
gclid). - Measures behavior signals such as scroll depth and interaction timing.
- Detects suspicious patterns common to bots and click farms.
- Feeds threat signals back into your protection workflows.
"Need help finding the <head> section?"
If you're stuck finding where to paste the manual snippet, the page lists quick paths for the most common platforms:
| Platform | Where the <head> is |
|---|---|
| WordPress | Theme header file, or a header/footer code plugin. |
| Shopify | Online Store → Themes → Edit code → theme.liquid. |
| Wix | Settings → Custom Code → Head. |
| Squarespace | Settings → Advanced → Code Injection → Header. |
For platforms not listed, search your CMS's docs for "add code to head" or "custom head HTML".
Managing an existing GTM tag
Once you've installed via GTM, the Tracking page surfaces a management section with the active tag's details and a Remove button.
Remove the GTM tag
This removes the tag from your GTM container and from ClickFortify's configuration. If you previously deleted the tag directly in GTM and just want to clean up ClickFortify's record, the same flow works — ClickFortify handles the "tag already gone" case gracefully.
Removing the GTM tag stops tracking immediately. Your dashboard will stop showing new clicks for this website until you reinstall (either via GTM again or by switching to manual install).
Switching between manual and GTM
You can switch install method at any time. There's no formal "switch" action — you just install the new method, then optionally remove the old one:
- Manual → GTM: click Setup with GTM to publish the GTM tag. The manual snippet on your site doesn't conflict — but you can remove it to keep things clean.
- GTM → Manual: copy the manual snippet from Option B, paste it on your site, then click Remove in the GTM section.
When tracking stops working
If the status badge changes to Pending setup after a site update:
- You redeployed without the snippet. Restore the snippet (or the GTM container, if you removed it).
- A theme update overwrote your
<head>. Common with WordPress theme updates — re-paste the snippet. - GTM container is paused or unpublished. Check the container's status in GTM. Re-publish if needed.
- Ad blockers in your test browser. Test in incognito with extensions off.
Full triage: Auto-detection and troubleshooting.
What happens next
- Conversion tracking — the second pixel layer for conversion events
- Verify your Google Ads connection — confirm the ads side is healthy too
- Auto-detection and troubleshooting — if tracking isn't detected